Jam making is neither tricky or time-consuming. Nor do you need fancy pants equipment or oodles of money! There are however a few simple rules that need to be followed to ensure deliciously sweet success.
In this post I will show you all the equipment you need and the tips to help you get started. It looks long and complicated but it’s not, just read through the instructions a few times to familiarise yourself with the steps. I will follow this post up with some favourite flavours for you to give a go! Read on and learn…


EQUIPMENT
See the equipment I use myself in the photos above. Nothing flash, it’s all very well used!
- LARGE POT. Do not – I repeat – DO NOT try to make jam in a small pot with low sides. Boiling fruit and sugar is extremely hot and will burn! It’s also a right pain in the bum to clean off the stove top, bench, walls, ceiling, floor and cat. Believe me – I know!
- CERAMIC SIDE PLATE. This goes in the freezer at the beginning and helps with judging setting point later on.
- SINK FULL OF HOT SOAPY WATER. You will need this to clean everything before you start and it makes life so much easier to clean as you go during the process. Once again, sticky jam is hard to clean off stuff once it sets! Remember ‘A good cook is a clean cook’.
- CHOPPING BOARD. It is never a good idea to chop stuff on the kitchen bench. A chopping board is much more hygienic if it is cleaned well to start with. It also stops things from slipping too much and also stops you getting growled at by your mum/dad/husband/wife…
- SHARP KNIVES. Blunt ones don’t cut fruit well, but they will cut your fingers well enough!
- WOODEN SPOON. Any large spoon will work but I reckon a wooden one looks far more authentic whilst making jam! A plastic one will do, but don’t use a metal one as it may get too hot to handle.
- SCALES. So important to get you measurement of fruit to sugar ratio correct.
- A JUG OR SMALL MEASURING CUP. To get the jam out of the pot into the jars. It can be a very messy business!
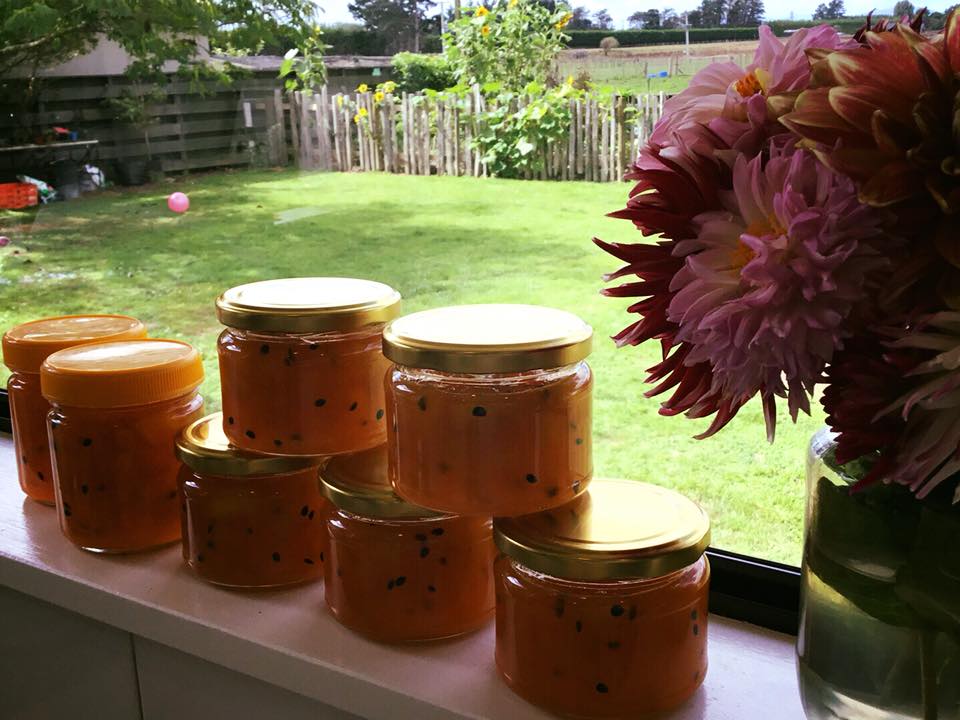
- GLASS JARS AND METAL LIDS. Obviously the jam will need something to go into once you have made it. Glass jars and metal lids are by far the easiest to sterilise and therefore keep your delicious nectar safe to enjoy.
- NEWSPAPER. A great tip my wonderful mum gave me. It makes the clean up at the end soooo much easier!
- CLEAN DAMP CLOTH. For wiping around the edge of the jars before putting the lids on. It must be clean! (Extra ones don’t hurt too!)
- APRON. I am a VERY messy cook, and for some reason always start my cooks wearing my best clothes only to realise partway through that I have made a complete mess of myself! My aprons are old, stained and numerous but they do the job :)
- TEA TOWELS AND OVEN MITS. I always have a few spare ones close at hand when I making anything!
- OPTIONAL EXTRA. Pretty labels. Not necessary but it is always a good idea to write a label with the content and date it was made. There are many dubious jars of who-knows-what at the back pantry…

THE NITTY GRITTY
This is how I roll at home! You’ll learn to multitask these things after a few jamming sessions :)
- HEAT. Turn your oven on to bake at 100 degrees celsius.
- PREPARE. Put that side plate in the freezer… I shall explain later.
- CLEAN. This is possibly the most important requirement of jam making. The first thing you must do is hot soapy wash. EVERYTHING! The chopping board, knives, jars, lids, bowls and utensils. It doesn’t take long, but saves heart break in a few months…Trust me!
- STERILISE. Put your jar lids in a pot with tap water covering them. Put the lid on the pot and bring to the boil for 10 minutes, then turn off. Leave lid on until the lids are needed. At the same time put your nice clean dry glass jars into the oven. They need to be there for about 30 minutes. At that point you can turn the oven off but just leave them in there until they are needed.
- CHOP your fruit into small bits. (I’ll talk about what fruit in the next blog) Weigh to see how much you have. Then measure out the same amount of sugar and set this aside. Put the fruit in your BIG pot with just a touch of water so it doesn’t stick when you start to cook it. (wash your knives and chopping board)
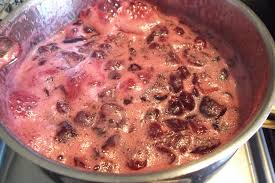
- COOK this gently (slow simmer on medium heat) until the fruit is soft, then get out your potato masher and take to it! My kids like it without too many lumps, but I am happy with a few chunks. Each to their own! (wash your masher)
- CRANK the heat up on the stove top (High) and then add the sugar. You need to be present and wielding that wooden spoon at this point to make sure nothing sticks to the bottom of the pot!
- STIR AND WATCH!!! Keep stirring the jam as the sugar starts to dissolve. Boil it rapidly/intensely/ferociously for about 10 minutes…. Add a good squeeze of lemon juice at this point.
- THE ONLY BIT THAT YOU CAN MUCK UP. Setting point! Take the side plate out of the freezer and dribble a small amount of your jam onto it. Move the plate around a bit for a minute or so, then run your finger through the jam (Lick your finger cos it will be good!) If the jam doesn’t run back together and makes a bit of a wrinkly skin on the top then you have reached setting point! WOOOOHOOO. (wash the plate)
- SHUT IT DOWN. Turn off the stove top and move your pot of jam off the heat. Lay thick sheets on newspaper down on the bench where you will be filling your jars. Get your jars out of the oven.. careful, they will be hot! And line them up on the newspaper. (wash your spoons)
- FILL. Use either your jug or small measuring cup (whichever you prefer) to fill the jars to NEAR the top. Don’t overflow them ‘cos is messy and hard to clean up! WARNING…THE JAM WILL BE SUPER HOT SO PLEASE BE CAREFUL. (Wash the utensils)
- COVER. So now your jars a full of goodness. Time to wipe the outside and rims of the jar with a clean damp cloth then take a warm lid from the pot of water add screw it on tightly. Put it aside to cool. Once cool the lid should invert slightly. this means it has sealed properly. If this doesn’t happen, DON”T PANIC, just keep the jars in the fridge until they are finished. (fill the pot with cold water and soak until ready to wash)
- CLEAN UP. Always the annoying bit but it has to be done. Screw up your newspaper and compost it if you can. Wash and dry all the equipment left.
- LABEL. Label you jam and date it so you know which to use first.


Not so hard huh! With a little practice you’ll have it nailed in no time. Homemade jam tastes a million times better than cheap store brought stuff, it has far more fruit, less sugar and is cheaper to make if you use fruit that is in season. Please see the short videos below that show the jam coming to a boil, getting near setting point and how to check if its there. This is obviously something that comes with practice but I hope I have given you a little knowledge to give it a go. It really is easy and VERY rewarding :)
For actual recipes and more info to help you out, please see my next jamming posting. There definitely ways to save jam if it doesn’t set, so please read on – Click this LINK. (coming soon)